
Thanks for swimming along with our sea turtles!
They can't wait to start swimming the many Second Life waters (and beyond) with you.
Quick Jump Links
● Mounts ●
● Companions & Wanderers ●
● Held & Decor ●
So first, some important stuff to note about animesh, which is what these are...
- Animesh requires an animesh capable second life viewer.
You can download the latest SL viewer here.
Or check out third-party viewers here. - Animesh can't be resized. This isn't our choice; it's a second life thing. Sorry!
- You can only wear one animesh object at a time.
... unless you have a premium account, then you can have two.
Again, this isn't our choice; it's a second life thing. Sorry!
All of our Sea Turtle products use very similar HUDs, but you'll want to make sure you're using the proper HUD for the sea turtle you're working with.
If you have the complete collection, you'll need to look for the name of the product you want to work with and wear/use the proper HUD to communicate with it.
When you make a change that's important to note, it will let you know in local chat with a private to you (the owner) message.
If you have the complete collection, you'll need to look for the name of the product you want to work with and wear/use the proper HUD to communicate with it.
When you make a change that's important to note, it will let you know in local chat with a private to you (the owner) message.
Mount
HUD & Functions
Important Note: Hover Height
These sea turtles are slightly different from our other mounts in that they are designed with animations for both land and sea. Because of this, you may want to make your avatar 'float' higher or lower from the ground. You can do this with 'Hover Height' - an attribute you can change easily and quickly on your avatar with Second Life tools.To do this:
- Right click on your avatar
- Choose 'Appearance' ❱❱ 'Hover Height'
- Use the slider bar to raise your avatar's height off of the ground, or enter a numerical value. We suggest trying .25
And now, let's move on to how the HUD works!

1. Help & Minimize
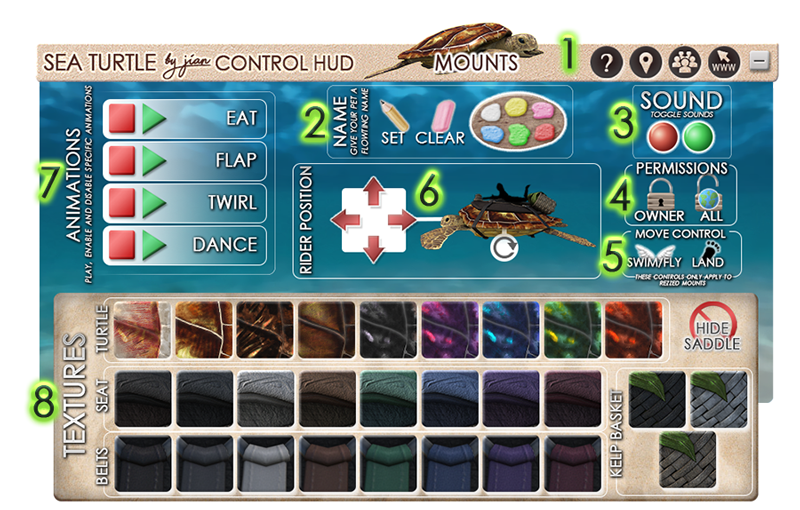
This bar has four circular buttons that do the follow in order:
- Help: leads to this page
- Landmark: opens your map in Second Life with a direct teleport location to our store
- Group: gives you a link in local chat to click to join our store update group
- Website: links you to our main blog
It also has a square button at the end that you can click to return the HUD to its minimized state.
For rezzed mounts:
Click either fly or surface from one or the other position to change how your mount moves - either flying through the sky or swimming on land or at linden water surface.
Your flight is also controlled with E/page up and C/page down.
E/Page Up gives your mount lift, C/Page Down lowers you toward the ground.
Again, none of this applies to WORN mounts, as they move wherever your avatar goes with normal movement and flying.
- Help: leads to this page
- Landmark: opens your map in Second Life with a direct teleport location to our store
- Group: gives you a link in local chat to click to join our store update group
- Website: links you to our main blog
It also has a square button at the end that you can click to return the HUD to its minimized state.
╼╼╼╼╼╼╼
2. Name
2. Name
Use these buttons to give your turtles a floating text name.
Click 'Set' (Pencil Icon) to get a drop down menu which will let you input text for your pet's floating text name once you click to submit it.
If you don't want a name anymore, click 'Clear' (Eraser Icon).
If you'd like to change it, click 'Set' again. No need to clear first!
After your pet has a name, click any of the 6 colors on the palette to change the color of the floating text.
╼╼╼╼╼╼╼
3. Sound
3. Sound
Turn your animal's sounds on or off.
Green for on, Red for off.
Green for on, Red for off.
╼╼╼╼╼╼╼
4. Permissions (Rezzed Mount Only)
4. Permissions (Rezzed Mount Only)
Permission controls only work with REZZED mounts.
Worn mounts can only be controlled by the person wearing them.
While seated on your REZZED mount, click either ALL or OWNER to change who can get on and move the mount.
If ALL, anyone will be able to.
If OWNER, only you as the owner will be able to.
╼╼╼╼╼╼╼
5. Swim/Fly & Land Animation Toggle
These controls work differently depending on whether you're using a rezzed or worn mount.Worn mounts can only be controlled by the person wearing them.
While seated on your REZZED mount, click either ALL or OWNER to change who can get on and move the mount.
If ALL, anyone will be able to.
If OWNER, only you as the owner will be able to.
╼╼╼╼╼╼╼
5. Swim/Fly & Land Animation Toggle
For rezzed mounts:
Click either fly or surface from one or the other position to change how your mount moves - either flying through the sky or swimming on land or at linden water surface.
Your flight is also controlled with E/page up and C/page down.
E/Page Up gives your mount lift, C/Page Down lowers you toward the ground.
Again, none of this applies to WORN mounts, as they move wherever your avatar goes with normal movement and flying.
For worn mounts:
When clicking to swim/fly or land with worn mounts, this will change which animation set your turtle uses as you move.
If you are swimming, it'll more freely float around and move as if swimming through water.
If land, it will flap and walk.
Either will also slightly change your height off of the ground, so change your hover height as needed to match and avoid clipping with the ground under you.
╼╼╼╼╼╼╼
6. Avatar Position (Rezzed Mount Only)
These buttons control where you are situated sitting on the mount.
** These buttons DO NOT AFFECT worn mounts**
To move your position with the worn ones, simply move the object with in-world editing tools to where you'd like it to be. You can adjust your avatar height independently afterwards if the mount is sinking into the ground or floating to have it match the ground level.
To change a rider's position:
- Choose L (left/driver) or R (right/passenger)
- Use the arrow buttons to move your chosen rider up, down, forward or back on the Z or X axis.
If you are unsure of which direction axis you're affecting, change your camera position to match the perspective of the illustration on the HUD, then press arrow buttons.
- You can reset the position by clicking the circular arrow button underneath the matching label.
***AN IMPORTANT NOTE ABOUT AVATAR ANIMATIONS***
More importantly however - you must grant the mount animation permissions when first seating on it. It will not ask you again for as long as you ride it. If you deny permissions, the mount cannot animate your avatar and you may end up looking a bit silly.
You can hop off and back on to try again with permissions.
╼╼╼╼╼╼╼
Click the red rectangle ▇ to eliminate that animation from your pet's animation cycle.
Click the green triangle ▶ to force that animation to immediately play and restore it to the animation cycle.
 1. Help & Minimize
7. Animation Toggles & Triggers
Your animal can perform two animations.Click the red rectangle ▇ to eliminate that animation from your pet's animation cycle.
Click the green triangle ▶ to force that animation to immediately play and restore it to the animation cycle.
╼╼╼╼╼╼╼
Click on the texture you wish to apply to your attached mount and it should immediately apply.
You must be riding a rezzed mount to apply textures or change any features on it.
8. Texture Palette
Your turtles can change texture for their skin/shell, saddle, belts on the saddle and the kelp basket.Click on the texture you wish to apply to your attached mount and it should immediately apply.
You must be riding a rezzed mount to apply textures or change any features on it.
Companion & WandererHUD & Functions

This bar has four circular buttons that do the follow in order:
- Help: leads to this page
- Landmark: opens your map in Second Life with a direct teleport location to our store
- Group: gives you a link in local chat to click to join our store update group
- Website: links you to our main blog
It also has a square button at the end that you can click to return the HUD to its minimized state.
Click the red rectangle ▇ to eliminate that animation from your pet's animation cycle.
Click the green triangle ▶ to force that animation to immediately play and restore it to the animation cycle.
- Help: leads to this page
- Landmark: opens your map in Second Life with a direct teleport location to our store
- Group: gives you a link in local chat to click to join our store update group
- Website: links you to our main blog
It also has a square button at the end that you can click to return the HUD to its minimized state.
╼╼╼╼╼╼╼
2. Name
2. Name
Use these buttons to give your turtles a floating text name.
Click 'Set' (Pencil Icon) to get a drop down menu which will let you input text for your pet's floating text name once you click to submit it.
If you don't want a name anymore, click 'Clear' (Eraser Icon).
If you'd like to change it, click 'Set' again. No need to clear first!
After your pet has a name, click any of the 6 colors on the palette to change the color of the floating text.
Click 'Set' (Pencil Icon) to get a drop down menu which will let you input text for your pet's floating text name once you click to submit it.
If you don't want a name anymore, click 'Clear' (Eraser Icon).
If you'd like to change it, click 'Set' again. No need to clear first!
After your pet has a name, click any of the 6 colors on the palette to change the color of the floating text.
*** To name a wanderer, it must be actively selected - see wander selections***
╼╼╼╼╼╼╼
3. Sound & Phantom
3. Sound & Phantom
Green for on, Red for off.
Sounds are hopefully self-explanatory, but they will play from the turtle's location if on audibly for all residents within range to hear.
Phantom means whether an object in Second Life has physical properties (ie. it can push you around or is a physical shape affecting movement).
'On' means your turtle will effectively be a ghost and cannot push avatars around.
'Off' means your turtle can push people around and must be walked over/around.
*** To change a wanderer, it must be actively selected - see wander selections***
╼╼╼╼╼╼╼
4. Wander Selections (Wanderers Only)
4. Wander Selections (Wanderers Only)
To work with wanderers, you must first click on the wanderer you want to work with.
You will see a floating particle icon over the wanderer if it is successfully selected to let you know it is actively selected and ready to register commands.
Use the green and red buttons to turn your wanderer on or off.
Turning your wanderer off will send it back to it's original starting point where you turned it on from.
With your wanderer selected and the icon floating above it, you can choose the radius & depth in meters it can wander from it's origin (starting) point.
You will want to position your turtle so that it is just barely sticking out of the water, if it is a 'water' version.
If it is a 'Land' version, have it set out at ground height before you begin.
Radius is a represented as a straight length out horizontally (think surface of water) from your animal's starting point. The animal will be able to wander anywhere horizontally from it's starting point in a circle around it at that length in meters.
Depth is represented as a straight length down from the surface of the water that you wanderer can move through and to the end of, in a half sphere below it.
*** Depth only applies to 'Water' wanderers***
Once you've applied both a depth and a radius of your choosing (the wanderer will otherwise, if turned on, default to the smallest radius and depth possible) you can click to turn on your wanderer and it will begin to move and animate.
╼╼╼╼╼╼╼
5. Animation Toggles & Triggers
Your animal can perform two animations.5. Animation Toggles & Triggers
Click the red rectangle ▇ to eliminate that animation from your pet's animation cycle.
Click the green triangle ▶ to force that animation to immediately play and restore it to the animation cycle.
*** To change a wanderer, it must be actively selected - see wander selections***
╼╼╼╼╼╼╼
6. Texture Palette
Your turtles can change texture for their skin/shell, saddle, belts on the saddle and the kelp basket.
Click on the texture you wish to apply to your attached mount and it should immediately apply.
*** To change a wanderer, it must be actively selected - see wander selections***
Click on the texture you wish to apply to your attached mount and it should immediately apply.
*** To change a wanderer, it must be actively selected - see wander selections***
Held & DecorHUD & Functions & Stuff
So hey!
If you're handy with photoshop and want to perfectly match whatever sand or ground texture you have on your land for your egg nesting turtles, here's a PSD that you should be able to use to make that happen.
If you are wanting to change the texture on the animesh egg nester, you will need to go under the edit window under the 'features' tab and uncheck animated mesh first.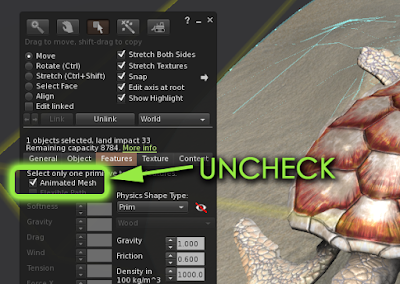 When you have changed the texture to your desired new one you've made, be sure to recheck animated mesh to allow your turtle to resume functioning and animating properly.
 Both the held and decor items are very similar and have nearly identical HUDs, so please forgive us for condensing this into the same spot!*** IMPORTANT: Decor Item Selection ***Like wanderers, decor objects will ONLY allow the HUD to register commands when they are actively selected, meaning they must have the floating particle icon over top of them in order to be listening for HUD commands.Select a decor item by left clicking or right click -> touching the item you wish to change.
If you're handy with photoshop and want to perfectly match whatever sand or ground texture you have on your land for your egg nesting turtles, here's a PSD that you should be able to use to make that happen.
If you are wanting to change the texture on the animesh egg nester, you will need to go under the edit window under the 'features' tab and uncheck animated mesh first.
 Both the held and decor items are very similar and have nearly identical HUDs, so please forgive us for condensing this into the same spot!
*** IMPORTANT: Decor Item Selection ***
Like wanderers, decor objects will ONLY allow the HUD to register commands when they are actively selected, meaning they must have the floating particle icon over top of them in order to be listening for HUD commands.
Select a decor item by left clicking or right click -> touching the item you wish to change.
╼╼╼╼╼╼╼
1. Help & Minimize
This bar has four circular buttons that do the follow in order:
- Help: leads to this page
- Landmark: opens your map in Second Life with a direct teleport location to our store
- Group: gives you a link in local chat to click to join our store update group
- Website: links you to our main blog
It also has a square button at the end that you can click to return the HUD to its minimized state.
╼╼╼╼╼╼╼
2. Name
Use these buttons to give your turtles a floating text name.Click 'Set' (Pencil Icon) to get a drop down menu which will let you input text for your pet's floating text name once you click to submit it.
If you don't want a name anymore, click 'Clear' (Eraser Icon).
If you'd like to change it, click 'Set' again. No need to clear first!
After your pet has a name, click any of the 6 colors on the palette to change the color of the floating text.
*** To name a decor object, it must be actively selected - see beginning section for help***
╼╼╼╼╼╼╼
3. Sound
Green for on, Red for off.Sound only applies to certain objects; not all of them. If the item doesn't have a sound function, pressing these buttons will not matter.
Helds do not have sounds.
*** To change a decor object, it must be actively selected - beginning section for help***
╼╼╼╼╼╼╼
4. Textures
Your turtles can change texture for their skin/shell, saddle, belts on the saddle and the kelp basket.Click on the texture you wish to apply to your attached mount and it should immediately apply.
*** To change a decor object, it must be actively selected - beginning section for help***